One click webinar setup is transforming the way businesses, educators, and marketers connect with their audiences online. In the past, hosting a live webinar required installing complex software, configuring multiple tools, and walking attendees through a download process before the event even started. However, Pageinar changes everything by letting you create and launch a fully functional, branded webinar in just a few minutes. Whether you are presenting a product demo, running a training session, or hosting a live Q&A, one click webinar setup means you spend less time on technology and more time engaging with your audience.
What Makes One Click Webinar Setup So Powerful?
Traditional webinar tools force hosts to install plugins, configure meeting rooms, and send attendees a software download link before every session. Additionally, technical issues during setup can delay your event and frustrate participants before they even see your content. One click webinar setup eliminates these barriers entirely. With Pageinar, your entire webinar runs on a hosted landing page that you share via a single URL. Therefore, attendees simply click the link and join in any browser, with absolutely no installation required on their side.
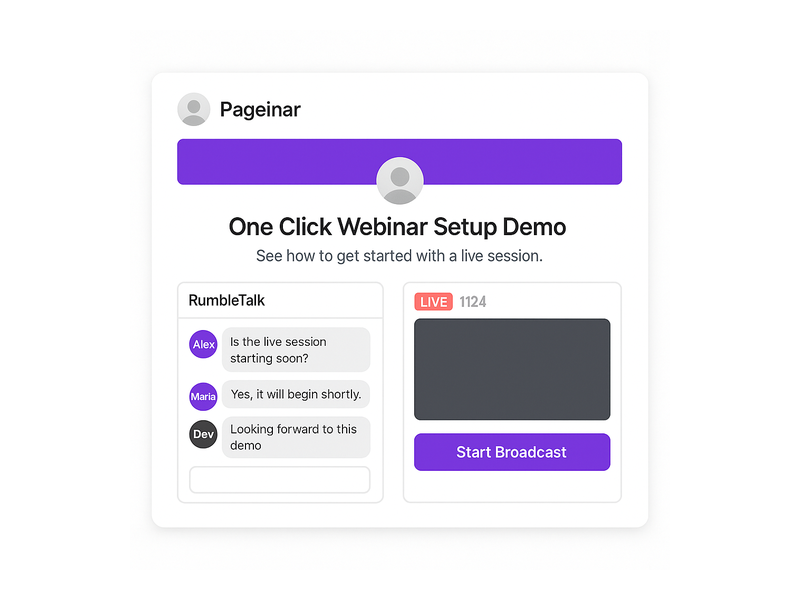
Furthermore, the platform integrates a live video broadcast area, a full-featured group chat powered by RumbleTalk, and a customizable registration form, all on one page. In fact, you can customize your page, toggle to Broadcasting Mode, and go live in under five minutes. This makes one click webinar setup the ideal solution for busy professionals who value speed and simplicity without sacrificing quality. Notably, leading brands including Nasdaq, Wix, HP, and Sony Music have trusted Pageinar for their live events.
How One Click Webinar Setup Works on Pageinar
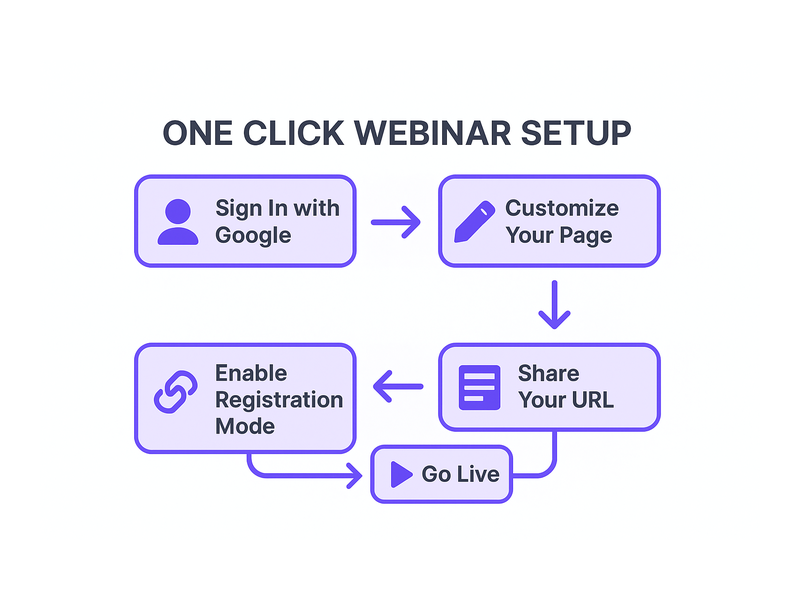
Getting started with one click webinar setup on Pageinar follows a clear and simple process. First, visit Pageinar’s instant webinar platform and sign in using your Google account. After login, you land directly on your main broadcast landing page, which is fully editable from the very first session. Second, customize your page by uploading a cover image or choosing a background color, adding your avatar, setting your webinar title, and writing an event description. Third, share your page URL with your audience and toggle to Broadcasting Mode when you are ready to go live.
In addition, you do not need to install any code on your website or configure a third-party server. The entire one click webinar setup happens inside your browser. Moreover, your page remains active between sessions, so you can reuse it for future events. As a result, your investment in setting up the page pays off every single time you host a new broadcast. Simply update your title and description, share the URL, and go live.
Signing In and Accessing Your Broadcast Page
Pageinar uses Google sign-in exclusively, which makes the authentication process fast, secure, and friction-free. After login, you arrive directly at your broadcast landing page. This page acts as your permanent webinar hub. Consequently, you do not create a new room for every event. Instead, update your content and toggle the mode to match your current session. This reusable approach is central to what makes one click webinar setup so efficient on this platform.
Customizing Your Broadcast Landing Page
Your broadcast page includes a fully editable header at the top. Here you can upload a custom cover image, choose a background color that matches your brand, add an avatar photo, edit your event title, provide a website link, and write a compelling event description. Additionally, every customization you make is immediately visible to attendees the moment they open your page URL. Therefore, your one click webinar setup still looks polished and professional, even without a dedicated design team.
Registration Mode: Collect Leads Before You Broadcast
One of the most powerful features of one click webinar setup is the built-in registration system. In Registration Mode, your page transforms into a branded sign-up form. Attendees fill in their details before the event begins, and their data is stored directly in your Registered List inside the settings panel. For example, you can collect first name, last name, company name, email address, phone number, and custom fields tailored to your specific event topic.
Moreover, the Registration Settings panel gives you full control over the template design, background color, welcome message, event date and time display, and an optional countdown timer. In fact, you can toggle the timer on or off based on your marketing strategy. The Pageinar knowledge base guide on collecting leads before the broadcasting event walks you through enabling each lead field step by step. As a result, your one click webinar setup doubles as a lead generation tool from the very first event you run.
Switching Between Registration and Broadcasting Mode
Your Pageinar page operates in two distinct modes that you toggle from the top-right corner. First, Registration Mode displays the sign-up form to visitors in the days or hours before your event begins. Second, Broadcasting Mode switches the same page to your live broadcast view, complete with the video player and the RumbleTalk group chat. Therefore, toggling between the two modes is all you need to move from lead collection to live broadcast. This seamless switch is a core part of the one click webinar setup experience.
Broadcasting Live: One Click Webinar Setup in Action
When you are ready to broadcast, switch to Broadcasting Mode and click the Start Broadcast button in the bottom-right area of your page. The broadcast area displays your current OFFLINE or LIVE status along with a live viewer count badge. Additionally, the integrated RumbleTalk group chat panel on the bottom-left activates automatically, allowing attendees to ask questions and interact with you in real time. Together, these features make your live session feel dynamic and engaging without requiring any extra configuration or technical steps.
In fact, the one click webinar setup extends to your audience experience as well. Viewers do not need to download any software or install a plugin. They simply open your shared URL in any modern browser and watch the live event instantly. Moreover, the RumbleTalk chat supports moderation tools, multiple visual themes, admin controls, and the ability to toggle the display of viewers and speakers. Consequently, you maintain complete control over your broadcast environment, even with a large and active audience.
Recording and Replaying Your Broadcasts
Pageinar records your broadcasts automatically. After each session, you can access past recordings in the Broadcast Recordings panel inside the settings menu. Each recording shows the session name, duration, and date, and you can export recordings for repurposing as on-demand content. Furthermore, offering replay access to registrants who missed the live session significantly increases the value of your one click webinar setup investment. In short, every session you run builds a library of reusable content assets.
Settings That Support Your One Click Webinar Setup
Beyond the main broadcast page, Pageinar’s settings panel provides granular control over every aspect of your event. First, Broadcast Settings let you add a page password for private sessions and connect your social media profiles, including Facebook, Instagram, Twitter, YouTube, and Twitch. Second, Chat Settings allow you to customize the group chat experience by setting an offline message, assigning a chat admin, selecting from multiple visual themes, and controlling whether viewers and speakers appear in the chat panel.
Additionally, the Subscription Details panel shows your current plan type, your attendee capacity limit, and the amount of broadcast time you have remaining. Therefore, you can plan upcoming events within your plan boundaries without surprises. In short, every setting you need for a smooth one click webinar setup is available from a single gear icon on your main page. No external dashboards and no separate tool logins are required.
Password Protection and Social Media Integration
For private or paid events, you can enable page password protection directly from Broadcast Settings. Attendees who visit your URL are prompted to enter the password before the page content is revealed. This feature is ideal for paid webinars, internal company training, or exclusive member-only sessions. Moreover, adding social media links to your page increases brand visibility and gives attendees an easy path to follow you after the event ends. These features add meaningful value to your one click webinar setup without any additional cost or configuration effort.
Use Cases for One Click Webinar Setup Across Industries
One click webinar setup is flexible enough to serve a wide range of industries and audiences. For example, a SaaS company can use Pageinar to run weekly product demos for new prospects, collecting contact details via the registration form before each session. Alternatively, an educator can host monthly online classes, toggling between Registration Mode and Broadcasting Mode to manage sign-ups and live lessons from the same permanent page URL.
Furthermore, marketing teams can run live product launch events, enabling the countdown timer and capturing leads in the days leading up to the announcement. In addition, HR departments use one click webinar setup to conduct company-wide announcements, employee onboarding, and training sessions without requiring any software installation from participants across multiple locations. As a result, the barrier to entry for high-quality live events drops to nearly zero, regardless of the size or technical capability of your organization.
One Click Webinar Setup for Solo Entrepreneurs and Small Teams
Small businesses benefit enormously from one click webinar setup because it requires no technical staff to manage or maintain. A solo entrepreneur can configure and run a professional live Q&A session from a laptop in under ten minutes. Additionally, the free plan allows smaller teams to test the platform before committing to a paid subscription. Better still, no attendee ever needs to download a plugin or create an account to join. In fact, the simplicity of this approach means that even a first-time host can launch a polished, branded webinar on day one.
Tips for a Successful One Click Webinar Setup
To get the most from your one click webinar setup, follow these practical tips before every event. First, always update your cover image and avatar before sharing your page URL. A branded landing page builds immediate trust and increases registration rates. Second, enable the countdown timer in Registration Settings to create urgency and encourage more attendees to sign up early. Third, set a friendly offline chat message in Chat Settings so visitors who arrive before the broadcast begins know when the session starts.
Moreover, always run a private test session before going live with an audience. Check your audio quality, video feed, and chat panel functionality in advance. Additionally, review the lead collection fields in Registration Settings to make sure you are capturing all the data you need for post-event follow-up. In other words, a few minutes of preparation before your one click webinar setup goes live can dramatically improve the attendee experience and your overall results.
Finally, use the Broadcast Recordings panel after each session to review what worked and identify areas for improvement. According to research published by the Content Marketing Institute, webinars consistently rank among the highest-performing content formats for B2B lead generation and audience engagement. Therefore, investing in a reliable one click webinar setup is not just a technical decision. It is a strategic business decision that compounds in value with every event you host.
Why Pageinar Is the Smartest Choice for One Click Webinar Setup
Pageinar stands apart because it combines genuine simplicity with broadcast-grade power. In fact, no other platform delivers a fully hosted webinar landing page that handles registration, live broadcasting, group chat, and lead collection through a single shareable URL. Moreover, there is no code to install on your server and no plugin required for your attendees. As a result, your one click webinar setup is truly frictionless from both the host perspective and the attendee perspective.
In addition, Pageinar’s billing is transparent and PayPal-based, making it accessible to businesses of every size. The Subscription Details panel shows your current plan, attendee limits, and remaining broadcast time at a glance. Therefore, you always know what you have available before planning your next event. For businesses that previously avoided webinars because of technical complexity or high platform costs, one click webinar setup removes every remaining obstacle.
Get Started with One Click Webinar Setup Today
If you are ready to host your first live webinar without the usual technical friction, Pageinar is built for you. Start by visiting Pageinar’s instant webinar platform and signing in with your Google account. Your broadcast landing page is ready immediately after login. Customize it, enable Registration Mode, share your URL with your audience, and go live when you are ready. For deeper inspiration on what is possible, read our post on Unlock the Power of Seamless Webinars with Pageinar: Welcome to a New Era of Online Engagement! to see real examples of how other hosts are getting results. One click webinar setup has never been more accessible, more affordable, or more powerful. Start your first live session today and experience the difference for yourself.